
The Raspberry Pi has become increasingly popular, and the online resources related to it are growing rapidly. Originating from the United Kingdom, the Raspberry Pi has gained a strong following in the open-source embedded community, where a culture of sharing is deeply rooted. As a result, numerous libraries and tools have been developed for the Raspberry Pi, making it more versatile and powerful. This article provides a detailed explanation of the Raspberry Pi GPIO interface and its programming methods.
**GPIO Basic Introduction**
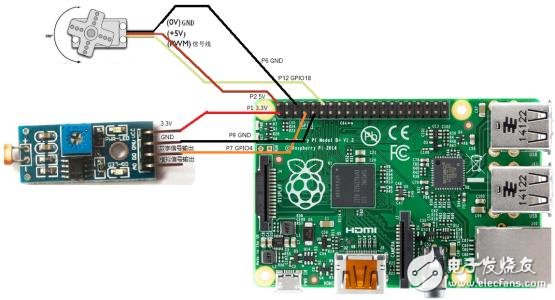
GPIO stands for General Purpose Input/Output. In simple terms, it refers to pins on the Raspberry Pi that can be configured as either input or output. These pins can read signals (high or low) or send signals to control external devices. GPIO is a fundamental concept in hardware interaction. It allows users to communicate with hardware components, such as sending data via UART, controlling devices like LEDs or buzzers, and reading status signals such as interrupts. Due to its versatility, mastering GPIO is essential for anyone working with hardware on the Raspberry Pi.
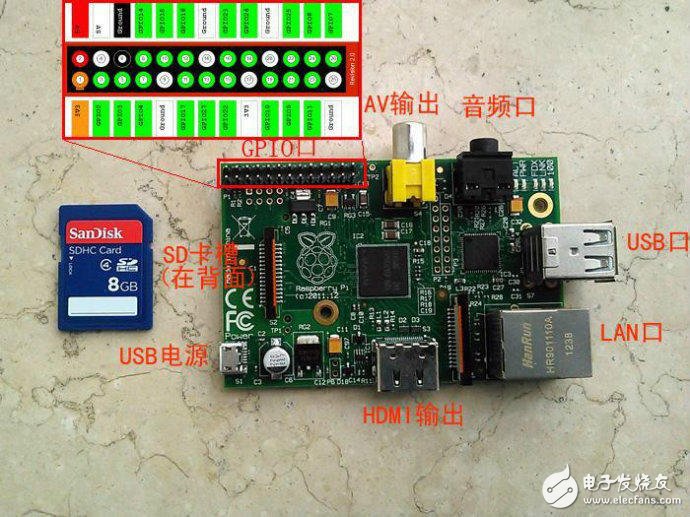
As shown in the diagram, each pin has a "Pin#" and "NAME" field. "Pin" refers to the physical pin number, while "NAME" represents the BCM (Broadcom) name assigned to that pin. For example, pins labeled "3.3V" and "5V" provide power, "Ground" connects to the system ground, and "GPIO0" indicates a user-configurable pin. Each of these pins can be controlled programmatically through software.
**GPIO Numbering Methods**
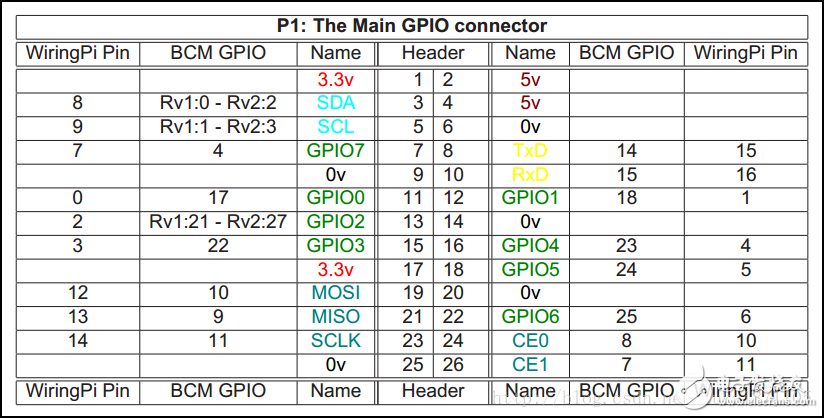
There are three common ways to refer to GPIO pins on the Raspberry Pi:
1. **P1 Header Numbering**: This method uses the physical numbering on the P1 header, starting from the top left and moving down and across. This is the most straightforward way to identify pins based on their position on the board.
2. **BCM2835 Numbering**: This approach is based on the internal GPIO register numbers of the BCM2835 chip. The numbers correspond to the specific registers used by the CPU to control the pins.
3. **wiringPi Numbering**: This is a user-friendly numbering system that assigns sequential numbers starting from 0, making it easier for programming. It is commonly used in the wiringPi library.
**Writing GPIO Code**
There are multiple ways to write and run GPIO code on the Raspberry Pi:
1. **Directly on the Raspberry Pi**: You can use text editors like nano or IDLE to write code directly on the device. Python and C are popular choices for GPIO programming.
2. **On Windows**: If you're using Python, you can write the script on your computer and transfer it to the Raspberry Pi via FTP. Then, use an SSH client to log in and execute the script. For C programs, you'll need to compile them on the Raspberry Pi to generate an executable file.
3. **On Other Linux Systems**: Similar to Windows, you can write code on another Linux distribution like Ubuntu. Use cross-compilation tools to build the program for the Raspberry Pi, then transfer the executable via FTP and run it.
In practice, writing code directly on the Raspberry Pi or using a Linux-based system is very similar, as both environments support the same development tools. Understanding how to work with GPIO is a crucial step in unlocking the full potential of the Raspberry Pi.
PPS Expandable Braided Sleeve is a type of protective sleeve that is used to protect and organize cables, wires, and hoses. It is made from a high-quality polyester material that is braided in a tubular shape. The expandable design allows the sleeve to easily expand and contract, accommodating different sizes of cables and wires.
Pps Expandable Braided Sleeve,Pps Braided Sleeving,Pps Expandable Sleeve,Pps Braided Sleevings
Dongguan Liansi Electronics Co.,Ltd , https://www.liansisleeve.com